Two Tone Lips

I have what I think is a super duper fun post for you all today! You’ve probably all heard about it, seen it, and read about it, but the Two Tone Lip Craze has been very popular with various designers this summer, and seems to/should be making its way into the average persons Autumn look. Sooo, I thought it would be great fun for me to try out some (more wearable) looks , all of them I find to be very subtle and easy to pull off. Below I have posted pictures along with the products I used to create the look shown.

twotone2

Rimmel Kate in 111 (Kiss Of Life) , Sleek Pout Paint in Cloud9Stargazer Fantasy Lipgloss in Hot Pink

twotone5

Revlon Matte 004 (Pink About It)E.l.f Studio Matte Lip Colour in Coral 

blushrubensque


FashionistA blush in CrimsonMAC PaintPot in Rubenesque

twotone7

Rimmel Kate in 111 (Kiss Of Life), Revlon Super Lustrious 353 (Cappuccino)

Hopefully you will all now try out some two tone looks for yourself, and if you do I would love to see them!
I can see myself in the future doing some more ‘christmassy’ looks at the end of the year, with some deeper reds and aubergine-y purples!
Thanks for reading
LuLu
x

Daily Makeup ‘Can’t Live Withouts’

So I thought today, that I would share with you my basic daily makeup products. Some I have been using for years and have never come across anything that I like better and some are newer products that have sneaked their way into my makeup bag!

As I said these products are my absolute basics, yes, most of the time I wear eye shadows and a wing of eyeliner but my looks change from day to day, whereas these are the products I use every time.

Daily

First I will start with the product that for me, has been around the longest, the one and only, ColourStay by Revlon. I want to say that it was back in 2008 that I first tried this product. Obviously, I did not use it on a daily basis back then as I was still a bit young to be wearing a lot of makeup, but at home, I loved being creative.

Currently I am using the colour 150 Buff from the dry/combination range, I also have it in some darker shades, so that when I use faketan I can mix the perfect colour! I find the coverage of this foundation to be medium, but it is easy enough to build it to full coverage without it looking cakey, which is great! Its also affordable but maybe a little more expensive than other drugstore foundations. Depending on where you go a bottle of this stuff will cost you around £12, which personally I think is great value as it tends to last me at least 4 months! It lasts alllllllllll day long and is just incredible.

The Expert Face Brush by Real Techniques has been one of my most exciting purchases of 2013. These brushes are just incredible and such great value for money, this brush is about £11 and can be used for almost anything. I use it to buff in my foundation, and after using this brush I only use about two pea sized amounts for my whole face! If you haven’t already jumped on the Real Techniques band wagon, I would highly recommend it, and I haven’t heard a single bad review on this brush!

Now for the product that I never thought would live up to the hype, Collection’s Lasting Perfection Concealer this was every where and is still being raved about till this day! If you haven’t got it get it. For only £4 this concealer is amazing, bags gone, spots gone, scars gone and redness, gone, all in the matter of seconds. This beats any MAC or Benefit concealer that I have tried and I will never use anything else!

Staying on the topic of concealers, I still love to use MAC’s Studio Finish SPF 35 concealer. I like to use it mainly on breakouts as it is very lightweight and contains the vitamins A and E which help reduce redness and overall help to clear up the spot. I would suggest this concealer to those who are more prone to oiliness as it contains the ingredient Silica which helps absorb the skins natural oils, this also can aid with breakouts as it helps dry them up!

A new addition to my make up bag this year has been the Mineralize Skinfinish in Natural by MAC, I have it in medium and it is perfect for my skin tone! It is a baked powder full of great minerals for your skin. I use it to set my foundation (before I religiously used Max Factor’s Facefinity compact powder foundation and still love it to this day and perhaps is a little more affordable!) and I love how it keeps my skin moisturized, which I didn’t think was possible for a powder to do.  From other reviews that I read before buying this product, everyone seemed to agree on the fact that this powder lasts for ages, so the £23 that i spent on it somewhat seems a little easier to part with!

Next up is a product that I seem to go on about all the time! Lancome Hypnose Doll Eyes Mascara, I absolutely love it! It’s incredible, it volumises and lengthens your lashes while still leaving them looking soo soo natural. The formula doesn’t allow it to clump no matter how many layers you apply. Usually I only use one layer for day time, and can build it up to three or four for a dramatic evening look!

Benefit’s BrowZings is the only eyebrow kit that I can ever see myself using. Before I used the one by e.l.f and coming in at only around £3 I thought it was amazing but after trying this a year ago, I will never go back! It matches the colour of my eyebrows perfectly and really keeps my eyebrows in place all day! It lasts me about 8 months, and I use it every single day, so the price of £23.50 is quite a good deal! (I use the shade medium)

Before I put on my makeup I like to apply a lipbalm to my lips to keep them nice and soft incase I decide to wear some lipstick. My favourite lipbalm has to be the one I received in my June GlossyBox, Figs & Rouge in the shade/scent of Cherry Blossom. (you can read my review and first impressions of it here.)

So just for fun and on my part all little bit of embarrassment, I thought it would be interesting for you all if I posted a ‘before/after’ picture of me using JUST these ‘can’t live without’ products, as I would like you to see what a difference they really make for me.

Before/After

Thanks for reading.
LuLu
x

Top Ten Tanning Tips

Now with summer fading along with my natural tan, I will start to find myself reaching once again for my favourite faker.

So here is a few tips that I have picked up over the years which enable me to glow like a golden goddess all year round!


  1. Make sure that you wax roughly 48 hours before tanning (and depending on your skin shave 24 hours before) to avoid your tan seeping into your pores leaving an uneven dotty colour.
  2. Giving your skin a good old scrub in the shower before applying fake tan is one step that you should never skip! You want to make sure that all your dead skin has gone and has left behind a lovely smooth base for applying your tan, otherwise you will find that the colour will fade away a lot quicker and a lot patchier. If your skin is generally quite dry (like mine) I find that using your scrub on dry skin, then, rinsing it off in the shower is very effective! This is the time that I absolutely love using my Kedem Kiwi&Mango Salt Scrub. (which you can read about at the bottom of My Favourite Moisturisers post)
  3. Don’t over moisturise! This is something that I recently wasn’t very aware of! We all want to moisturise before we tan to try to get as smooth a base as possible, but this will in fact stop the tan from completely developing, leaving you a little underwhelmed in the morning when it seems to all wash off in the shower! Instead opt for a oil free moisturiser like the one from FakeBake, and only apply it to the dryer areas of your body such as elbows, knees and ankles! “The moisturiser will act as a diluting agent for areas that grab the tan more” – as said by Leighton Denny, co-founder of the Sun-Believable range.
  4. Don’t rush! Try to leave at least an hour between jumping out the shower and applying your tan. After having a hot steamy shower your body will still be ‘sweating’ out excess moisture which can interfere with the tan developing.
  5. Avoid using your hands at all costs! For me a mitt is perfect, as long as you chuck it into the washing machine before using it again. Some tans when left in open air turn a horrible green colour, so if you decide to use your mitt after it has turned green you will find that the colour will transfer onto your body and will leave it a less than pleasant colour.
  6. Work your way up. Start at your feet, otherwise if you bend over to get to your feet at the end you could end up leaving fold lines across  your stomach and patches on your thighs!
  7. Feeling a little sticky? Take an old clean tanning mitt and put some talc on it, then pat around your underarms and anywhere that your skin touches ( behind knees, inside legs and elbows) as not only will it stop the sticky feeling but will also stop any moisture that might prevent the tan from developing.
  8. Avoid hot showers! Try and get used to a luke warm shower also don’t rub or wipe yourself dry, try patting your skin dry instead, again this will help keep your colour for longer!
  9. Try to moisturise your body twice a day (morning and night) this will help lock in your lovely olive glow!
  10. Night Out? If you are going out and really want to show off your tan, try a spray oil on your legs (baby oil works great too!) or even a little shimmery bronzer down your shins and along your collar bones! Don’t get carried away though, you don’t want to be mistaken for the Christmas tree in the holidays!

Happy Tanning!
LuLu

x

tan-beach2

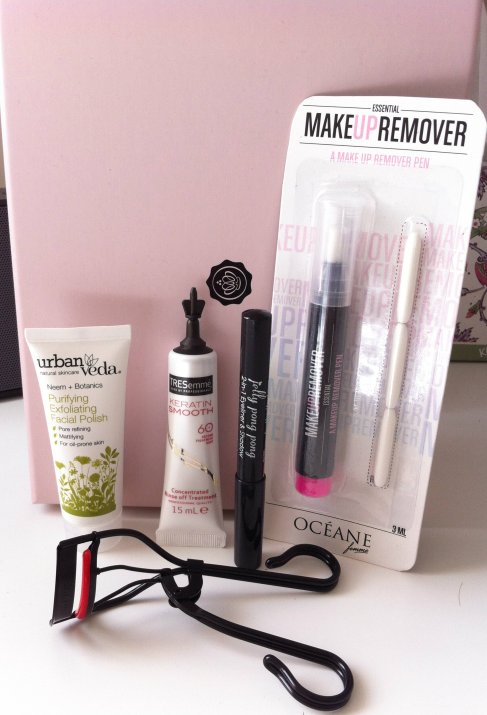
August GlossyBox

I would just like to say that these are my first impressions, I haven’t tried these products enough to give them an honest review.

Image

This month was a majjjjor let down, the theme was called ‘HighFlyers’, and I have to say I have no understanding of how the products I received resemble it. 

Products:

Urban Veda Exfoliating Facial Polish, Makeup Remover Pen, Jelly Pong Pong Eyeshadow/Eyeliner Stick, TRESemme Keratin Smooth Treatment, Emite Eyelash Curlers. 

I am looking forward to trying the facial scrub as it is the sort of product that I use daily. The eyelash curlers arn’t my favourite as I prefer the plastic version, but I am sure I will get some use out of them. I will defiantly use the hair treatment, but I doubt it will be a product that I repurchase as I have a hair treatment that I am currently more than happy with! The Jelly Pong Pong 2in1 Eyeliner and Shadow just doesn’t seem that interesting, but I will give it a go, you never know, it might be in this months favourites! 
As for the makeup remover stick, what even is that? Have I gone back to being 7 years old? I’m not sure what the people at GlossyBox where thinking when they chucked this in, it looks and feels cheap and just reminds me of a unwanted product from a magazine. 


Review: Benefit Matthew Williamson ‘The Rich Is Back’ Box

I got this box as a present for my birthday and have finally used it enough to tell you genuinely how I feel about it. First of all, the packaging is gorgeous and resembles Matthew’s flash back to the glamorous days of disco, this box is vibrant, seductive and totally GLAM.

“THIS IS HIGH-OCTANE GLAM MAKEUP FOR DRESSING UP TO LOOK FABULOUS & DANCE THE NIGHT AWAY!”

– MATTHEW WILLIAMSON

the rich is back

Inside you will find a fabulous Eye Shadow Palette, Mini They’re Real! Mascara, Inferno Lipgloss, and Gimme Fever Blush.

Benefit

Swatches of the palette below:

swatch

Disco Dust, Solid Gold, Get Down Brown, Feel So Teal

I can’t fault the eye shadows, they all work great together or by themselves, they are very pigmented and seem to suit every complexion out there! For an everyday look I love using Disco Dust in my inner corner and to highlight my brow bone, then Solid Gold all over, with Get Down Brown blended into my crease. Then for a more seductive look, I like to blend Feel So Teal into the outer corner of my eye while deepening the Get Down Brown in my crease trying to wing it out a little at the same time!

lip

This lipgloss was a bit of a miss for me, the swatch shows a lovely glittery red-coral colour, but i find that on the lips it is barley noticeable, and for my skin tone it isn’t that flattering, BUT I do like to use it over a deep red lipstick, as it adds a nice glamorous shine.

The Gimme Fever blusher didn’t want to show itself in any of my swatches today but I find it to be a very natural colour which gives my cheeks a healthy peachy glow! I already have a full size of the They’re Real! Mascara, but the miniature is great for carrying around in my bag or taking away on holiday, and lets face it, it’s super cute!

Overall I give this makeup box a massive thumbs up, I absolutely love it and have recently been reaching for it every Saturday night! tut tut.

July Favourites

Using my iPhone to take pictures is really starting to take its toll.. then again I am no photographer, but I promise I will soon start to use my camera!

July Favourites

So, this month has been a very busy one, which shows in this months favourites.
First up is the Anatomicals ‘Spray Misty For Me’ Facial spritz, which I got in the July GlossyBox. As the weather seems to be getting increasingly hotter, this stuff has been used everyday whether it be refreshing my skin in the morning, setting my makeup or brightening my skin after washing my face, it just does everything!!
Next the Lancome ‘Hypnose Doll Eyes‘ Mascara, I bought this in a two pack after absolutely adoring, the original Hypnose, and this month I feel as if I have fallen in love all over again! Its quick and easy to apply, no lumps, no dusty fall aways, its blacker than black, and will never be leaving my makeup bag!  The wand is shaped like a pyramid, which lengthens the outer corner of your eye whilst giving them a good old lift and curl, this is what supposedly creates the ‘doll eye’ look.
I only bought the infamous, Real Techniques Core Collection along with the Expert Face Brush at the beginning of July, and I have to say that I am so gutted that I hadn’t bought them earlier. The Expert Face Brush allows me to apply my liquid foundation quickly and easily, while leaving it looking flawless. I love how dense this brush is, and how you can really buff it into the skin!  One thing i have always believed is that no matter how expensive and amazing your makeup is, it won’t look good if you don’t use the right ‘tools’, you will also be surprised how good you can make cheaper cosmetics look when they are used and applied properly!
Now for the products that I have been most excited about. The new, Rimmel London Apocalips Lip Lacquer. I currently have the colours Galaxy’ and Luna’These are lipglosses with the colour of a highly pigmented lipstick! They have wonderful staying power, and also a wonderful collection of colours. I went quite ‘everyday’ with the colours that I purchased, Luna is nude with orangy undertones which really compliment a tan, and Galaxy is a deep purple with blue undertones which seem to suit all complexions. I would give this product a massive thumbs up!
Finally, this is a product that has been sitting in my cupboard for what feels like forever, I’m not even sure if it is still in the shops! (please let me know). Loreal De-maq expert ‘Cashmere Milk Expert Makeup Remover’, this stuff works like a charm. It is verrrrry gentle on the skin, it is also very concentrated, so a pea size amount for your whole face is all that you need! It takes away my hardest to remove mascaras in just one swipe!

So that is the end of this months faves!
I would love to know what you all have enjoyed using this month!

July GlossyBox

Glossy

This month’s GlossyBox was a Seaside Splash Theme, it wasn’t overly impressive but it wasn’t terrible. I received a sun screen by Coola and some Sleek Sticks by Essie, both were products I wasn’t very interested in. I also got two Sleek Pout Paints, one in white, which shocked me a little at first, and another in a very vibrant hot pink. The idea behind this product is that you can add it to another lip colour to create your own new colour, some people received an electric blue Pout Paint – now that would have been interesting! I do not use these products for their intended purpose, I use the white as a base for certain eye shadows, to brighten up the inner corner of my eye, or to highlight my brow bone (in extreme).   I warn you that you only need a very minute amount of it as it is insanely pigmented!
I also received a bottle of facial spritz by Anatomicals, which you can read more about in my July Favourites!
I have also enjoyed using the Bamboo Style ‘Boho Waves Tousled Texture Mist’. I find it to by a mix between a hair spray and a salt spray, it doesn’t give my hair the texture that a salt spray does, but it holds it softly in place, like that of a hair spray. Overall I like this product, it is being used repeatedly so there can’t be much wrong, but I would have to have a think before I considered buying another one. 

Get your Glossy Box here

Mini Update

I would first like to apologize as I haven’t posted for a very long time. Everything has been so busy! My Birthday has just passed, exam results have come in and I am excited to say that I will be moving off to study Midwifery!  So there is still so much I need to sort out and get ready as I will be leaving home in just over 4 weeks!!

I have numerous posts to publish, all of which should be live by tomorrow morning, everything from July’s GlossyBox, July Favorites, Birthday Treats, Beauty Haul, and a little surprise as well!

I’d love to hear if any of you are leaving home to study this year, or if there are any fellow student midwives to be!
If you are interested I would suggest following me on Instagram for most up to date news and purchases!

Have a great day!

LuLu
x